How to create a new product?
Print
Modified on: Tue, 8 Sep, 2020 at 12:48 PM
- Click on Products and select Products

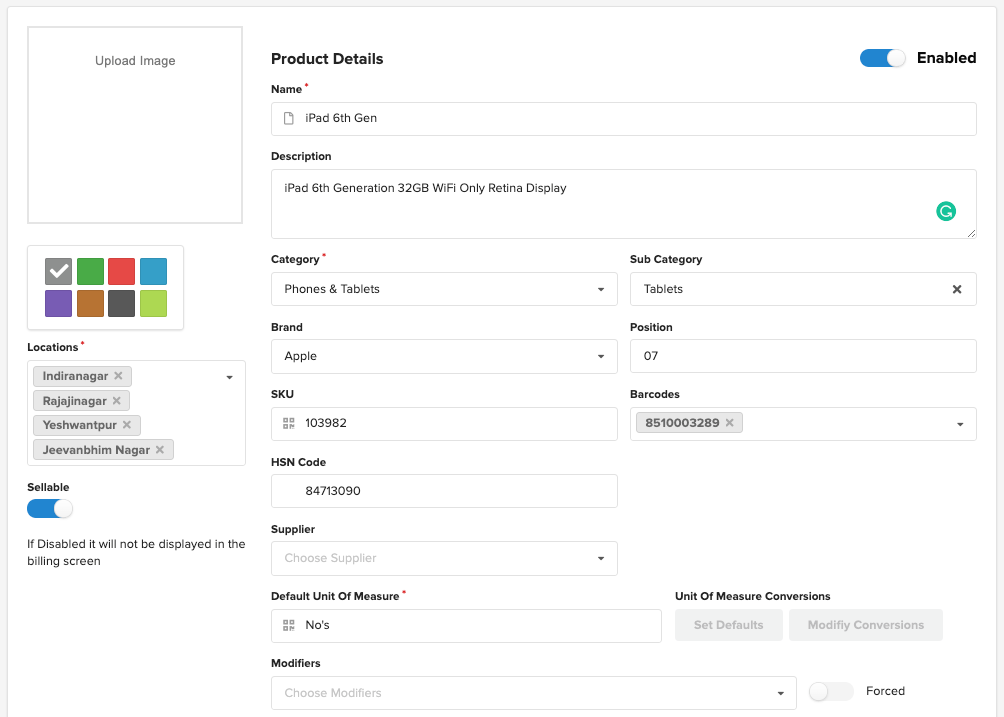
Click on Add New Product and fill up all the necessary details.
| Header | Description | Example | Required |
| Enabled | Enable or Disable based on product availability |
| Enabled by default. |
| Name | Enter the Product Name | iPad 6th Gen | Yes |
| Description | A short description of the product if required (Same will be used in integrations if available) | iPad 6th Generation 32GB WiFi Only Retina Display | Optional |
| Category | Select the Category to which the product has to be assigned | Phones & Tablets | Yes |
| Sub Category | Select the Sub Category to which the product has to be assigned | Tablets | Optional |
| Brand | Select a brand to which the product belongs. | Apple | Optional |
| Position | Enter the numeric values for the alignment of products in POS and Online integrations | 7 | Auto assign if not entered based on alphabetic |
| SKU | Unique stock-keeping code for the product | 103982 | Optional |
| Bar-code | Barcode of the product for easier accessibility | 8510003289 | Optional |
| HSN | 6-digit HSN Code as per govt standards | 84713090 | OPtional |
| Suppliers | Select a supplier for the product | Micro | Optional |
| Default Unit of Measure | Enter the measuring unit of the product | No's | Yes |
| Modifiers | Select the modifier set if any (Enable Forced if modifiers has to be auto asked immediately after product added to cart) | Additional Accessories | Optional |
| Tags | Enter as veg/non-veg/egg etc (Will be used in online integrations) | NA | Optional |
| Location | Select the location the product to be added |
| Yes |
| Sellable | Enable/Disable depending on whether the product is sellable at the location or not (Switch it off for raw materials/ingredients so that they won't be visible in POS, but the product is still assigned to selected locations and inventory tracking happens if applicable) |
| Enabled by default. |
| Color | Select any color for the product (To identify it easier in the billing screen. Typically followed process is veg products - green color; non-veg products -red color; etc) |
| Selected by default. |
| Image | Upload image of the product less than 2 Mb ( if required) |
| Optional |
| Cost Price | Cost price of the product (Receiving price from vendor) | 25500 | Optional |
| Tax | Select the tax applicable for the product | GST 12 | Auto selected the first tax |
| Inclusive | Enable/Disable if the prices are inclusive of taxes/exclusive of taxes |
| Disabled by default |
| Enable Tracking | Select Yes/No if inventory tracking has to be enabled/disabled |
| Disabled by default |
| Allow Negative Selling | Select Yes/No if products to be sold after inventory stock goes down to "0" or beyond |
| Disabled by default |

- Click on Create to complete creating the new product
- After the product is created, scroll to the Sale Channels tab and click on More

- Update the following details
| Header | Description | Example | Required |
| Selling Price | Enter the selling price of the product | 28999 | Yes |
| Display Price | Enter the MRP of the product | 29999 | Optional |
| Tax | Select the Tax applicable | GST 12 | Auto selected the first tax |
| Charge | Select the charge applicable additionally if any |
| Optional |
| Tax Inclusive | Enable if the Selling Price if inclusive of taxes or exclusive |
| Disabled by default |
| Inventory Allow Negative | Enable/Disable if products to be sold after inventory stock goes down to "0" or beyond |
| Disabled by default |
| Sellable | Enable/Disable if the product is sellable in the respected Sale Channel | Few products may be sellable only at store, not on Online. Enable/Disable as per sale channel | Enabled by default |
| Enabled | Enable/ Disable if the product is available in stock | If product is discontinued, then product can be disabled | Enabled by default |

- Click on Done and then click on Save to complete updating the product
Did you find it helpful?
Yes
No
Send feedback Sorry we couldn't be helpful. Help us improve this article with your feedback.